Release Notes 2026
Frequently Asked Questions!
How do I see descriptions of codes in enquiry screens?
How do I access field level help?
How can I delete a payment run
How do I stop over receipting of orders
Why has my transaction not appeared on the payment run?
How do I stop a user posting to a prior and future period
How to copy and delete lines during data entry?
Prevent user posting to specific balance classes
Download Templates
User setup requires multiple screens and is complicated!
Changing security access to a user
Out of office
How do I give a user read only access?
De-allocate and an AP Payment
Can I run a report to view security groups against my users?
Hints and Tips!
Useful information to include when raising Financials cases
Navigation Hints and Tips
Browse Timeouts
Accounts Payable Quick Cards
Accounts Payable Supplier File
Accounts Payable Data Entry
Log Invoice/Credit Note
Enter a logged Invoice
Non Purchase Order Related Invoice Entry
Order Related Invoice
Order Related Invoice with Mismatches
Order Related Invoices - mismatch scenarios
Mismatch Types
Invoice and Credit Note Matching
Accounts Payable Enquiries
Accounts Payable Payments
Payment Processing
AP Payment Cancellation
Create a manual payment
Re-run Bacs Remittance
Payment Processing Audits
Single Supplier Payment Processing
Transaction Maintenance
CIS Processing
Accounts Payable Code Tables
Accounts Receivable Quick Cards
Customer Maintenance
Data Entry and DDI Mandates
Enquiries
Cash Allocation
Credit Control
Student Sponsor
General Ledger Quick Cards
Chart of Accounts Setup
Create a new nominal code
Create management and analysis codes
Creating and Amending Nominal and Management code relationships
Create a new GL Structure Element
General Ledger Data Entry
Journal Entry
General Ledger Journal Multi Level Authorisation
Modernisation Budget Upload
Journal Upload
General Ledger Enquiries
Account Details
Trial Balance
GL Enquiries - Balance Sheet & Profit and Loss
Enquire across multiple years
Transactions Enquiries
Period and Year End Close
General Ledger Security
General Ledger Tax Journals
Fixed Assets Quick Cards
Prompt File - Asset Creation Updated
Fixed Assets Period End & Depreciation Updated
Revaluation
Disposals
Relife
Purchasing Management Quick Cards
Inventory Management Quick Cards
Return to Store
Stock Taking
Create Demand on Store (Financials)
Bin Transfers
Stock Disposal
Stock Adjustments
Import Tool Kit
Reconciliation Processes - Helpful how-to guides
Daily Checks
General Ledger Reconciliation Reporting
Accounts Payable Reconciliation Reporting
Accounts Receivable Reconciliation Reporting
Fixed Assets Reconciliation Reporting
Purchasing Management Reconciliation Reporting
Procurement Portal
Procurement Portal Overview
Navigation
Requisitions
Orders
Authorisation
Receiver
Invoice Clearance
Portal Administration
Procurement Portal – Teams Setup
Invoice Manager
Bank Reconciliation
Bank Reconciliation Overview
Bank Reconciliation Menus Explained
Bank Reconciliation Company Controls
Bank Reconciliation Code Tables
Transaction Types and Sub Types
Bank Reconciliation Enquiries
Bank Reconciliation Reports
Manual Bank Reconciliation
Bank Reconciliation Take-on
Unmatching Transactions
Reporting
General Ledger Reports
Account Payable Reports
Fixed Assets Reports
Sales Invoicing Reports
Accounts Receivable Reports
Bank Reconciliation Reports
Purchase Invoice Automation (PIA)
March Release
February Release
January 2026
Deleting Supplier training data
Resetting password - Smart Workflow
Purchase Invoice Automation (PIA)
Adding a New User - Smart Workflow
Password Reset in Smart-Capture
How to Create a New User in Smart-Capture
Reprocessing Failed OCR Supplier Invoices
Smart Capture Email Configuration Overview
Configuring Smart Capture to use Gmail in the Web UI
MAP Configuration Non-Microsoft and Non-Google Accounts
Configuring Smart Capture to use Microsoft 365 (Graph API) in the Web UI
Suggested Testing Areas
Release Notes - New UI Improvements
June Release 2024 - New UI Improvements
May Release 2024 - New UI Improvements
April Release 2024 - New UI Improvements
Release Notes 2025
December 2025
November 2025
October 2025
September 2025
August 2025
July Release
June Release
May 2025
April 2025
March 2025
February 2025
January 2025
Release Notes 2024
December 2024
November 2024
October 2024
September 2024
August 2024
July 2024
June 2024 Release
May 2024 Functional Changes
Financials Design Improvements
User Interface Overview
User Preference Improvements
Alerts & Field Error Focus
The all new Data Grid!
Input Fields & Dynamic Validation
Screen Structure
Miscellaneous New Features
Generic Actions
Chart Functionality
Bring Your Own BI (BYOBI)
Collaborative Planning
Financial Reporting Consolidation
Business Process Manager
Request a Customer
Request a Supplier
Request a Sales Invoice
Request a Management Code
Request a nominal code
Create a Pay Request
API
Air Approvals
Contents
- All categories
- Bank Reconciliation
- Bank Reconciliation Code Tables
Bank Reconciliation Code Tables
 Updated
by Caroline Buckland
Updated
by Caroline Buckland
Code Tables overview
Before Bank Statements can be loaded into Financials, it is essential that the following topics are understood on what Financials setup is pre-configured for ease of use and where setup is required, based on requirements.
The following list is a means of checking that the critical entries are made and are correct.
Bank Nominal
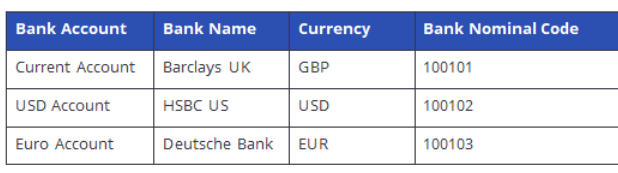
A bank nominal (also known as a bank nominal code or general ledger account code) is a unique accounting code used in Financials to represent a specific bank account in the general ledger.
Each bank account an organisation holds (e.g. a current account, savings account, or foreign currency account) needs to be mapped to its own nominal code. This enables accurate tracking of cash movements and proper financial reporting.
What is the purpose of a Bank Nominal?
- Categorisation: Helps categorise transactions in the general ledger under "bank accounts."
- Reconciliation: Facilitates bank reconciliations by matching system transactions with actual bank statements.
- Reporting: Supports financial reporting, such as cash flow statements and balance sheets.
- Control: Ensures traceability and control over which transactions affect which bank account.
Example:
Bank Code
A Bank Code in Financials is a unique identifier used to represent a specific bank account profile. It acts as the master record for each physical bank account an organisation uses, whether it's for operating funds, payroll, petty cash, or foreign currency transactions.
Key Elements of a Bank Code
A Bank Code typically stores key details about the bank account, such as:
- Bank Name (e.g. Barclays, HSBC)
- Account Number
- Sort Code / IBAN / SWIFT
- Currency
- Country
- Bank Nominal Code -The general ledger account used to track transactions in this bank account
- Reconciliation Settings (e.g. auto-match rules)
- Tolerance Settings
Relationship to the Bank Nominal
The Bank Code is where you assign the Bank Nominal Code — the GL account that reflects the actual money in that account. This link ensures that all transactions processed through that bank (e.g. payments, receipts, reconciliations) are posted to the correct place in Financials.
Example:

Create a Bank Code
Navigate to: Main Menu > General Ledger > GL Chart of Accounts > Maintain Nominals
Find your Bank Control Nominal. This will be given to you on the Requirements Sheet. Highlight the code and select the Copy option.
Create a Nominal Code “ZZXX” where ‘XX’ is your Bank number. Amend Description to read “Bank Code XX”.
Check the following fields have been marked as applicable:
- Bank Account
- Reconciliation Required
Navigate to: Main Menu > System Admin > Module Controls > Bank Reconciliation Controls > Bank Codes
Insert to create a new Bank Code.
Bank Details Tab
Bank Code: Enter Bank number on Requirements sheet
Description: Enter Bank number and “Current Account”
Bank Sort: Enter 999999 (Test Bank Name)
Account No: Enter 12345678
GL Account: Enter Account Code from Requirements Sheet
BTZ Element: If required for your company – see Requirements Sheet
Currency: Enter GBP
IBAN: Only enter if required
Closing Balance: Enter 0.00
Statement Date: Enter date of last period end
Controls Tab
Tolerances: Only enter if required
Write Off GL Acct: Only enter if required
Business Event Manager: Enter your Username and email address
Once Completed, select Save
Create a Bank Transaction Type and Sub Types
Navigate to: Systems Admin > Module Controls > Bank Reconciliation Controls > Bank Transaction Types
Enter your Bank Code: Created in above.
Select Search
Select Insert
Create a ‘Transfer Out’ type for Bank Charges posting to GL
Transaction Type: Enter TRO
Transaction Sub Type: Enter BCH
Description: TO Bank Charges
Recon Code Format: Enter “Reference”
Auto-Processing: Select “Auto GL Journal”
GL Account: Enter GL Account from Requirements Sheet
Once Completed, select Save and Return
Select Insert
Create a ‘Transfer In’ type for Unreconciled Bank Statement Items
Transaction Type: Enter TRI
Transaction Sub Type: Leave Blank
Description: Transfer I
Recon Code Format: Enter “Reference”
Auto-Processing: Select “None”
Once Completed, select Save and Return
Select Insert
To create a ‘Transfer In’ type for posting to AR Ledger
Transaction Type: Enter TRI
Transaction Sub Type: Enter AR
Description: Update to AR Ledger
Recon Code Format: Enter “Reference”
Auto-Processing: Select “Auto AR Batch”
Auto Processing Defaults allows entering further information that can dictate the posting on the AR. Check Requirements Sheet.
Once Completed, select Save and Return